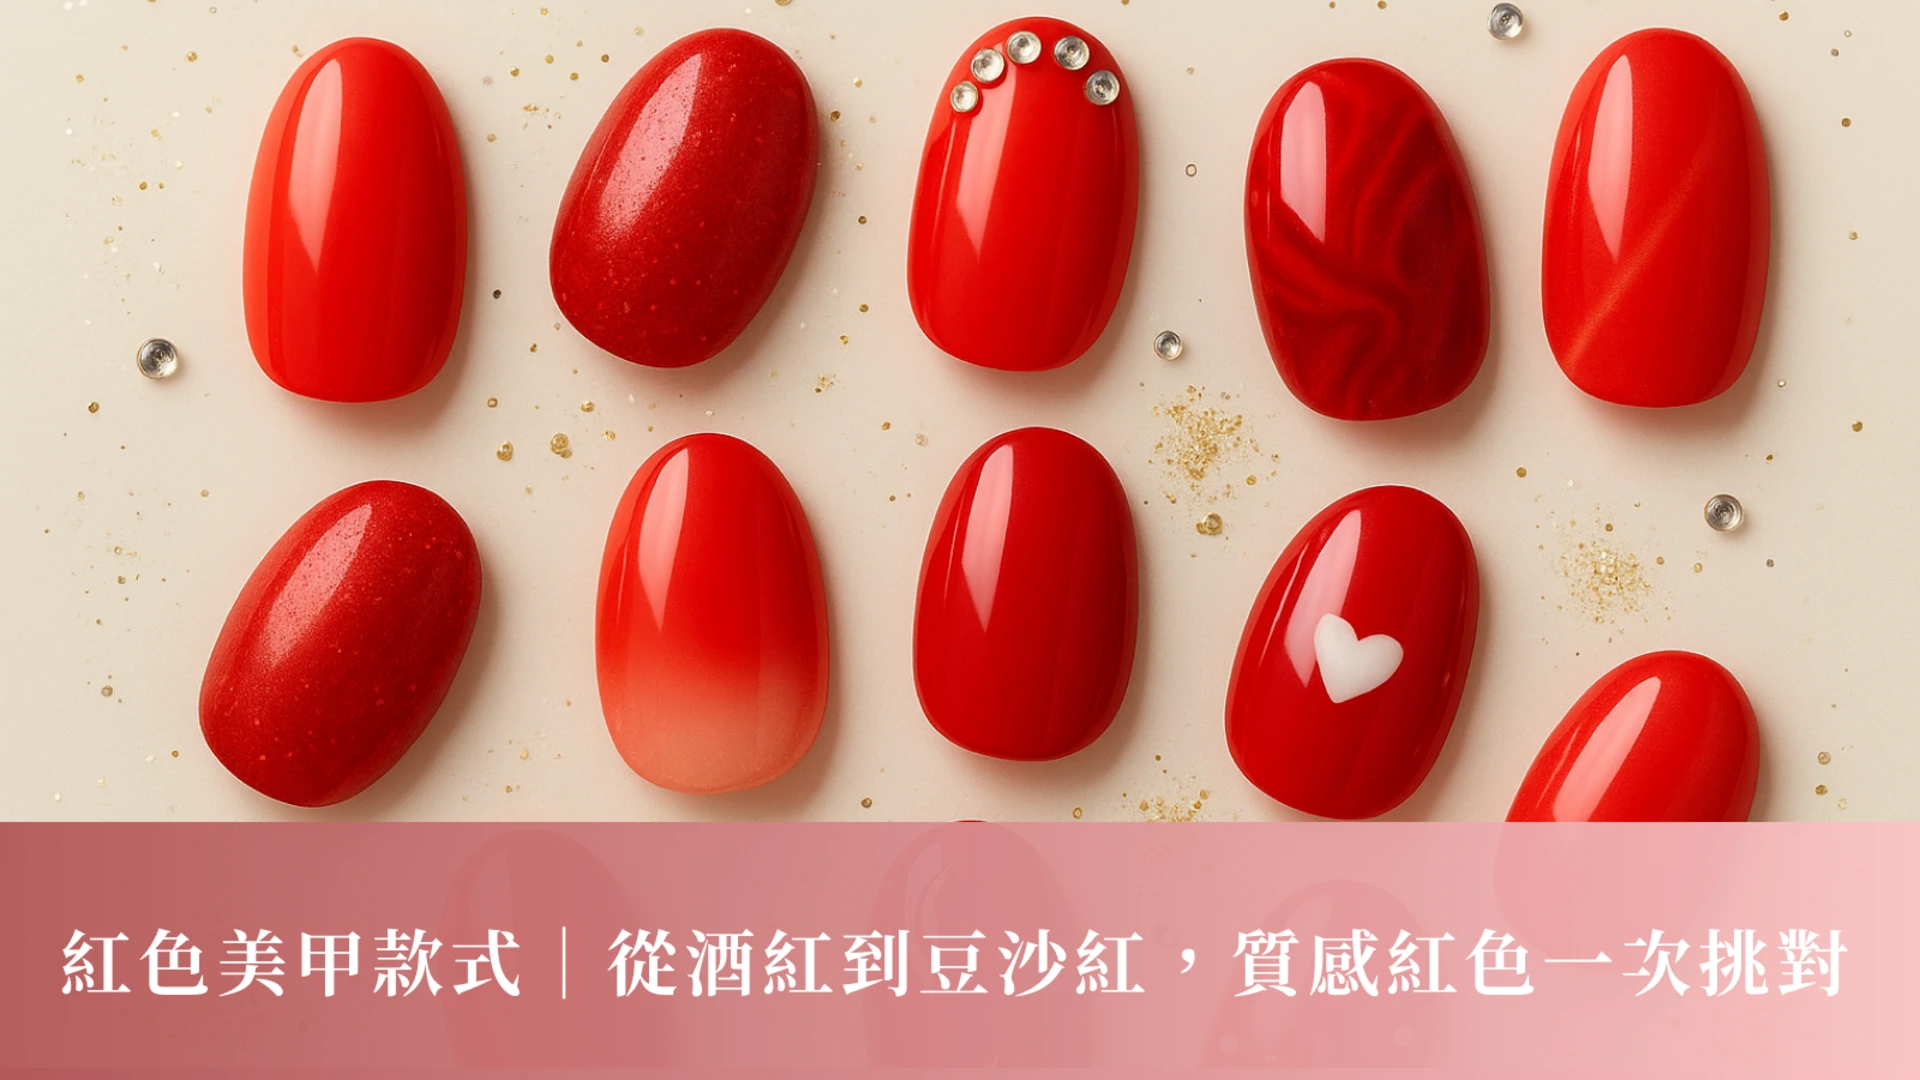
Red Nail Art Designs | From Burgundy to Dusty Rose, Choose the Perfect Textured Red Every Time

Red Nail Art Designs | From Burgundy to Dusty Rose, Choose the Perfect Textured Red Every Time
Red nail art is a timeless classic, suitable for both work and parties. For a more individual look, opt for matte, gradient, or marble finishes to create nuanced details with different shades of red. This article focuses on red nail art, providing a comprehensive overview from shades to textures, and includes sample designs from various salons. You can easily find the perfect design based on your skin tone, nail shape, and the occasion. We've also covered maintenance tips and common pitfalls to help you avoid unnecessary hassles and save money. Additionally, we've outlined guidelines for matching common nail shapes and lengths to facilitate communication with your stylist.
Red nail art designs | How to choose the one that best complements your skin tone
When choosing a red, first consider its brightness and saturation: For cool-toned fair skin, choose a true red or berry red with blue undertones to brighten the back of your hands; for tanned skin, choose a red with brown or brick undertones for a warmer look. If you're worried about it being too flashy, use a matte top coat or fine gold foil to soften the visual impact. Beginners can start with a "single color + one accent color" look, then try cat-eye, mirror, or ultra-fine gold lines to maintain a clean and sharp look while adding subtle highlights. If your nails are short and wide, choose short, rounded shapes and narrow glossy surfaces to make your fingers appear longer; to conceal the nail groove, leave a small white space on both sides. For a more timeless look, choose a red with a brightness close to your skin tone; to increase its presence, simply increase the saturation. Before applying the color, buff your nails with a fine-grit polish and thoroughly remove dust and oil to reduce edge lifting and prolong the color's staying power.
Burgundy nail art | Mature and sophisticated, a versatile piece for your autumn/winter wardrobe
To achieve a sophisticated look with burgundy, opt for a low-brightness base with a hint of brown or purple. If you're worried about it making your nails look darker, pair it with creamy white or a nude beige for a pop of color. For everyday wear, use a short, rounded style with a glossy finish; for formal occasions, add a cat-eye or mirrored nail polish for an instant shine. Gold jewelry, wool coats, and wool knits all go well with it. A blue-toned berry red is especially flattering, and a matte finish further minimizes its impact. For a vintage feel, add rose gold accents or delicate lace details for a more sophisticated look. For a more formal appearance, use a very fine gold trim to create a gown-like effect; for everyday wear, opt for a matte finish to reduce shine and maintain a composed look. For those with dry cuticles, apply a thin layer of nail polish the night before and then apply a glossy top coat the next day for a more translucent shine.

Work reference| Wanda (@wanda77_nails)
Dusty rose red nail polish | Gentle and flattering, perfect for everyday wear.
Mauve red, a shade between pink and red, is low-saturation with a matte finish and is the most universally flattering. A grayish mauve is more brightening, while a coral orange undertone adds a touch of vibrancy. For work, choose a single color with a matte finish on all your hands; for dates, add a very fine French manicure or small gold sequins to two fingers for a subtle touch that's only noticeable up close. It pairs especially well with cream-white clothing and gold accessories. If your fingertips tend to be dry, exfoliate and moisturize before applying a matte finish to avoid highlighting any graininess. For those who don't like pink undertones, choose a reddish-brown mauve; it's not too sweet but still has a sophisticated feel and is suitable for all seasons. To make your skin look brighter in photos, test two color swatches under natural light and choose the one that makes your complexion appear more even.
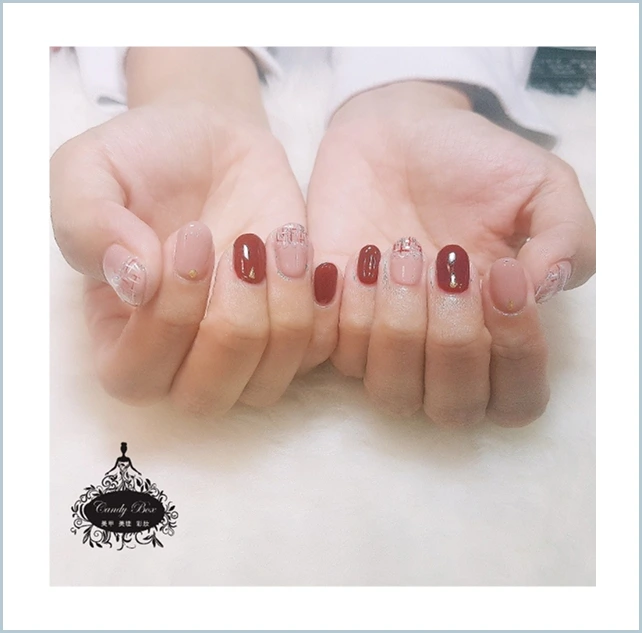
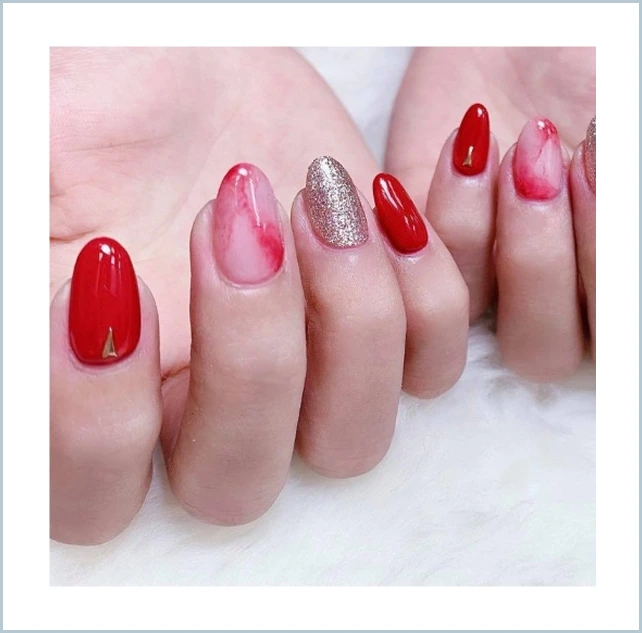
Artwork reference | Candy Box (@cutecandy520)
Red French manicure | Classic lines, timeless elegance
A red French manicure is lighter than a full red; to enhance the appearance, use a narrow arc or subtle V-shape. For a more conservative, professional look, pair it with a clear or milky white base, drawing only thin lines at the tips. For festive occasions, add glitter or a mirror finish to one nail. For maintenance, return to the salon for a touch-up every 3-4 weeks; it will still look fresh when it grows out. If you're worried about unstable lines, you can use stickers or liner gel to help; draw a light outline first, then apply a top coat for a higher success rate. Keep the line width at the tip to within one-fifth of the nail width for a cleaner look; the narrower, the more refined. For an easier color change, limit the French red to within one-third of the tip for a clean look when it grows out.
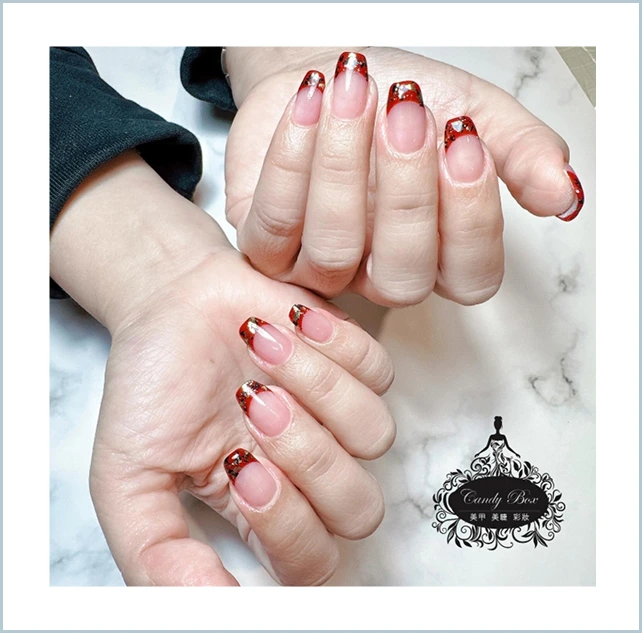
Artwork reference | Candy Box (@cutecandy520)
Reddish-brown nail art | Sophisticated and timeless, goes with any wardrobe color.
Reddish-brown combines the boldness of red with the warmth of brown, making it a versatile and forgiving color choice. In autumn and winter, opt for a brownish-reddish-brown paired with wool and leather; in spring and summer, switch to a reddish-brown with cotton and linen. For short nails, choose a matte finish for a clean look; for long nails, choose a mirror finish or a subtle glitter overlay for added dimension. If you're worried about a heavy look, try a two-tone milk tea color on two nails. If your skin tone is yellowish, choose a shade with a hint of rose brown to tone down the yellow and create a cleaner look. It's recommended to use reddish-brown and metallic accents sparingly to avoid clashing with the width of your nails and creating a heavy appearance. For a softer look, try a color combination of reddish-brown with milk tea and nude pink for a lighter overall feel.
Artwork reference | Candy Box (@cutecandy520)
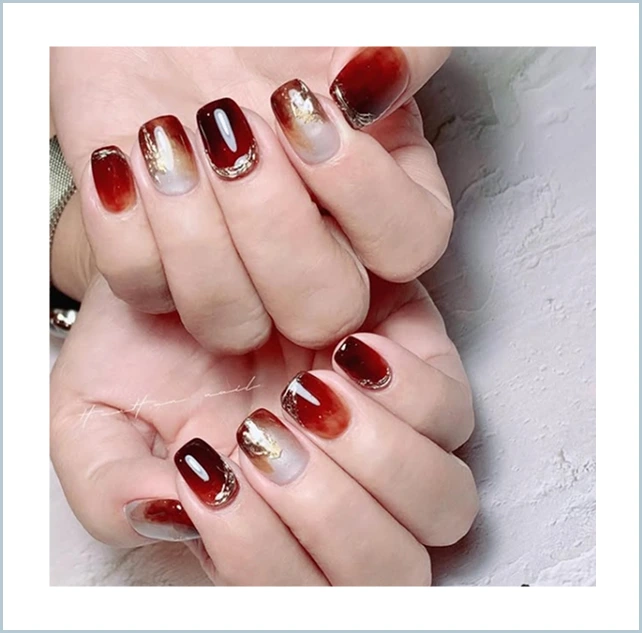
Red ombre nail art | Soft and translucent, light and shadow flowing on fingertips
The key to red ombre is a soft border and maintaining white space. For an ethereal look, add fine silver powder or thin gold foil; for a more individualistic look, pair it with deep burgundy or black lines. It goes best with flowing materials like silk and chiffon; for work, reduce the area of the red ombre and use a nude pink base for a subtle yet interesting effect. Two to three layers of ombre are the safest; too many layers will look muddy. Apply each layer thinly for better transparency. If you're worried about it looking muddy, concentrate the main ombre color in the center of the nail, leaving a transparent border around it for a cleaner look. Use a sponge to gently pat the edges of the ombre for a smoother, more diffused effect than a brush.
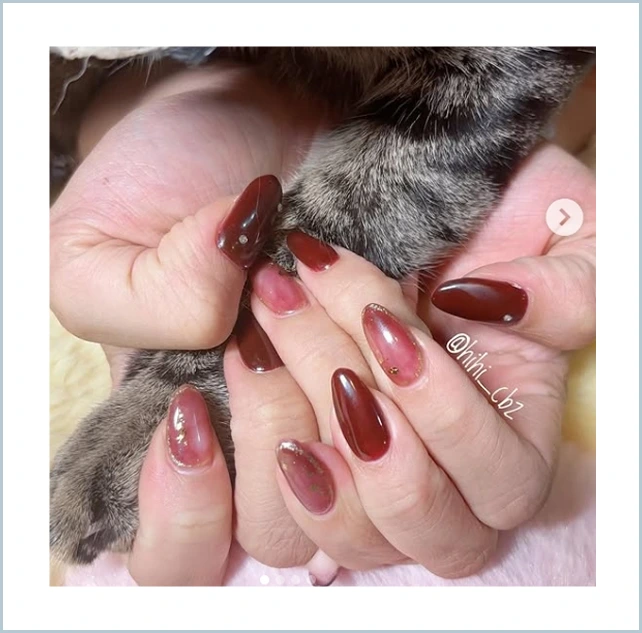
Reference material | HiHi_Cbz (@hihi_cbz)
Red marble nail art | Layered textures, even more captivating up close
Marble patterns are achieved by layering two to three shades of red and white/nude pink, then applying a semi-transparent gel to create a textured effect resembling natural stone. For a more glamorous look, add gold thread or foil along the pattern; for a more everyday look, limit this to two nails, keeping the rest in a single color or creamy white. Medium-short to medium-length nails best showcase details; too short and it's easy to smudge, too long and it's difficult to maintain. For a more natural look, add a touch of rose gold foil to balance the overall tone. When applying the textured pattern, use irregular turns to avoid excessive symmetry; finally, use transparent gel to lightly cover the patterns and add depth. To create more depth in the marble pattern, first apply a layer of semi-transparent pink, then interweave red and white to create a cloud-like effect.
Artwork reference | Candy Box (@cutecandy520)
Red gradient nail art | A subtle transition from fingertip to nail root
For a natural gradient, follow the three steps of "red → nude pink → clear"; for a stronger presence, use "berry red → true red → nude pink". Vertical gradients on short nails make fingers appear longer; you can also create horizontal or diagonal variations on one finger to create rhythm with other fingers. Concentrate the red in the tip third of the nail so it doesn't look awkward when it grows out. If your nail tips often split, you can seal the very tip with a fine glitter for durability and a cleaner look. Diagonal gradients are suitable for pairing with rings and fine gold trim, naturally drawing attention to the nail tips. If the nail surface is uneven, use a fine glitter as a transition layer for a smoother gradient.

Reference material | HiHi_Cbz (@hihi_cbz)
Conclusion | Red tones are actually more everyday than you think
Red nail art is actually quite versatile for everyday wear. First, decide on the brightness and texture based on the occasion, then subtly adjust the lines and embellishments within the "red nail art" range to make it a highlight of your outfit. Save this post, compare your work with designers' Instagram creations, and choose the red that best complements your complexion. Book your appointment now to wear a healthy glow on your fingertips. Small changes can perfectly balance your complexion and overall look. Use this post as a color guide and technique chart; your next color change won't be a matter of luck. And don't forget to regularly maintain your cuticles! Save and share this post now!

